


Introduction
Business Process Model and Notation (BPMN) has become the global standard for visualizing, analyzing, and optimizing business workflows. At the heart of every BPMN diagram are events—fundamental elements that represent something that happens during a process and directly influences its flow. Whether you’re documenting a simple approval workflow or modeling a complex enterprise system, understanding how to effectively use BPMN events is essential for creating clear, accurate, and actionable process diagrams.

This comprehensive guide explores the three core categories of BPMN events—Start, Intermediate, and End—detailing their triggers, visual representations, configuration options, and practical applications. By mastering these elements, business analysts, process architects, and developers can design more resilient, responsive, and maintainable business processes that align with organizational goals and technical requirements.
BPMN Event Overview
A BPMN event in a business process diagram refers to something that happens and affects the flow of process. There are three types of events to use in business process modeling: Start, intermediate and end.
 |
|---|
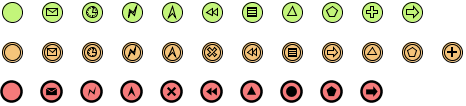
| Start, intermediate and end events with different kinds of triggers and results |
Start Event
A start event indicates the place where and possibly why a process starts. Since start event is used for initiating a process, it does not have any incoming sequence flow. You can define a trigger for start event, to show the condition(s) that will cause a process to initiate.
| Trigger name | Representation | Description |
|---|---|---|
| None |  |
The none start event does not have a defined trigger. |
| Message |  |
This trigger starts the process by receiving a message from a participant. |
| Timer |  |
This trigger starts the process in a specific time-date or a specific cycle (e.g. every Friday). |
| Error |  |
This trigger starts an in-line event sub-process when an error occurs. Note that this trigger can only be used with an event-sub-process. |
| Escalation |  |
This trigger starts or not to start an in-line event sub-process when the constraint specified is not satisfied. Note that this trigger can only be used with an event-sub-process. |
| Compensation |  |
This trigger starts an in-line event sub-process when an compensation occurs, which requires undoing some steps. Note that this trigger can only be used with an event-sub-process. |
| Conditional |  |
This trigger starts the process when a specific condition becomes true. |
| Signal |  |
This trigger starts the process when a signal broadcasted from another process has arrived. Note that signal is different from message in the sense that it has a specific target for message. |
| Multiple |  |
This means that there are multiple triggers of the process. Any one of them can cause the process to start. |
| Parallel Multiple |  |
This means that there are multiple triggers of the process. All of the triggers must be triggered in order to start the process. |
| Link |  |
This trigger provides a means to connect the end result of one process to the start of another. |
Different types of start event trigger:
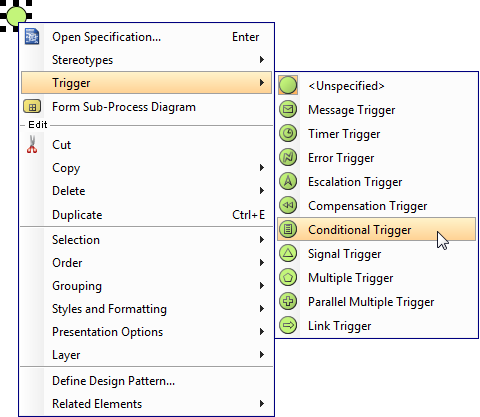
Defining a trigger
To define a trigger on an event, right click on the event and select Trigger, then click on the type of trigger from the popup menu.
 |
|---|
| To define a start event trigger |
If you want to edit the properties of the trigger, such as the condition of a conditional trigger, right click on the event and select Open Specification… from the popup menu. Then, click on the … button next to the drop down menu of Trigger to edit its properties in the popup dialog box.
Interrupting or Non-interrupting event sub-process
Start event can be attached to the border of an event sub-process to initiate the sub-process inline. You can define this kind of trigger as either interrupting or non-interrupting, which means to interrupt its containing process or not to interrupt its containing process respectively. To set a trigger to be Interrupting or Non-Interrupting, right click on the event and select/de-select Triggers > Interrupting from the popup menu.
 |
|---|
| Interrupting (left) and Non-Interrupting (right) events |
| NOTE: | Only triggers that can be attached to event sub-process can set as interrupting/non-interrupting. The supported trigger types include: Message, Timer, Escalation, Error, Cancel, Compensation, Conditional, Signal, Multiple, and Parallel Multiple. |
|---|
Intermediate Event
An intermediate event indicates where something happens in between the start and end event of a process. You can use an intermediate event to show where messages are received or sent, show the necessary delay, perform exception handling and show the need of compensation. You can place an intermediate event in two places: Attaching the boundary of task/sub-process, Normal flow (i.e. connected from a flow without attaching to an activity).
| Trigger name | Representation | Description |
|---|---|---|
| None |  |
The none intermediate event does not have a defined trigger. It is used to indicate change of state in the process. You can only use a none intermediate event in a normal flow. |
| Message |  |
This trigger represents either a send or receive of message |
| Timer |  |
This trigger acts as a delay mechanism on a specific date-time or cycle (e.g. every Friday). You can only use a timer intermediate event in a normal flow. |
| Error |  |
This trigger reacts to a named error or to any error if no name is specified. |
| Escalation |  |
The trigger indicates where an escalation is raised. You can only use an escalation intermediate event in a normal flow. |
| Cancel |  |
This trigger will be fired when a cancel end event is reached within the transaction sub-process. It also shall be triggered if a Transaction Protocol “Cancel” message has been received while the Transaction is being performed. |
| Compensation |  |
The trigger indicates the need of compensation. |
| Conditional |  |
The event will be triggered when the condition specified become true. |
| Link |  |
This trigger is used for linking two sections of a process. You can use it to mode a looping of flow or to avoid having long sequence flow connectors appear on diagram. You can only use a link intermediate event in a normal flow. |
| Signal |  |
This trigger indicates the sending or receiving of signals, which is for general communication within and across process levels, across pools, and between business process diagrams. |
| Multiple |  |
This means that there are multiple triggers defined. Any one of them can cause the event to be triggered. |
| Parallel Multiple |  |
This means that there are multiple triggers defined. All of the triggers must be triggered in order to trigger the multiple event. |
Different types of intermediate event trigger
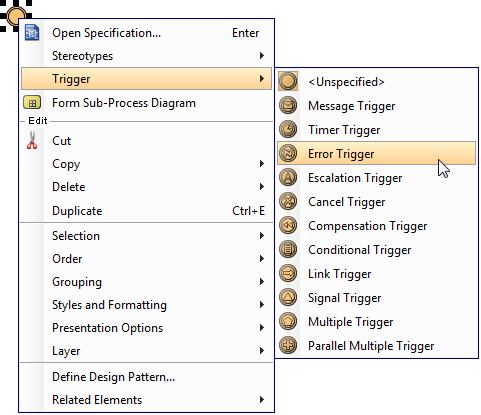
Defining a trigger
To define a trigger on an event, right click on the event and select Trigger, then the type of trigger from the popup menu.
 |
|---|
| To define an intermediate event trigger |
If you want to edit the properties of the trigger, such as the condition of a conditional trigger, right click on the event and select Open Specification… from the popup menu. Then, click on the … button next to the drop down menu of Trigger to edit its properties in the popup dialog box.
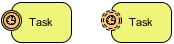
Throw and catch
You can set an event to be catch or throw. Catch means to react to a trigger, while throw means to create a trigger. To set, right click on an event and select Trigger, then either Catching or Throwing from the popup menu.
 |
|---|
| A catch event (left) and a throw event (right) |
| NOTE: | The trigger types that can set as throw/catch include: Message, Escalation, Compensation, Link, Signal, and Multiple. |
|---|
Interrupting or Non-interrupting event
Intermediate event can be attached to the border of an activity. You can set an event to interrupt or not to interrupt the activity to which it is attached. To set a trigger to be Interrupting or Non-Interrupting, right click on the event and select/de-select Triggers > Interrupting from the popup menu.
 |
|---|
| Interrupting (left) and Non-Interrupting (right) events |
| NOTE: | Only triggers that can be attached to event sub-process can set as interrupting/non-interrupting. The supported trigger types include: Message, Timer, Escalation, Conditional, Signal, Multiple, and Parallel Multiple. |
|---|
End Event
As an opposite of start event, end event indicates where a process will end. Since end event is used for terminating a process, it does not have any outgoing sequence flow. You can define a result for end event, to show what will happen when reaching the end.
| Trigger name | Representation | Description |
|---|---|---|
| None |  |
The none end event does not have a defined result. |
| Message |  |
This result ends the process by sending a message to a participant. |
| Error |  |
This result indicates the generation of a named error when the process ends. |
| Escalation |  |
This result indicates the trigger of escalation when the process ends. |
| Cancel |  |
This result indicates that the transaction should be cancelled. |
| Compensation |  |
This result indicates the need of compensation, which require undoing some steps. |
| Signal |  |
This result indicates that a signal will be broadcasted when the process ends. Note that signal is different from message, which has a specific target for message. |
| Terminal |  |
This result indicates that all activities in the process should be immediately ended. |
| Multiple |  |
This result indicates that there are multiple consequences of ending the process. |
| Link |  |
This result provide a means to connect the end result of one process to the start of another. |
Defining a result
To define a result on an event, right click on the event and select Result, then the type of result from the popup menu.
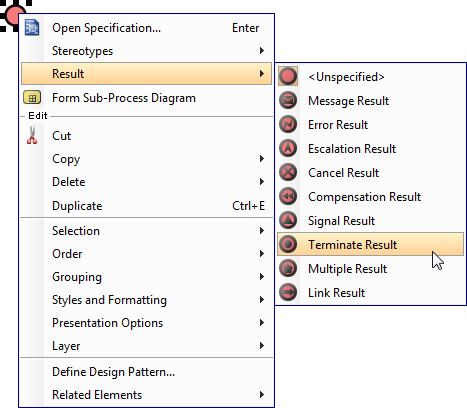 |
|---|
| To define an end event result |
If you want to edit the properties of the result, such as the message produced by a message result, right click on the event and select Open Specification… from the popup menu. Then, click on the … button next to the drop down menu of Result to edit its properties in the popup dialog box.
Conclusion
BPMN events serve as the critical “pulse points” of any business process diagram—marking where processes begin, how they respond to internal and external stimuli, and how they conclude. By strategically selecting and configuring Start, Intermediate, and End events with appropriate triggers and results, process designers can model workflows that are not only visually intuitive but also semantically rich and execution-ready.
Key takeaways for effective BPMN event usage:
-
Start events define process initiation logic—choose triggers that accurately reflect real-world conditions (e.g., timer for scheduled jobs, message for external requests).
-
Intermediate events enable dynamic process behavior—leverage catching/throwing semantics and interrupting/non-interrupting options to handle exceptions, delays, and communications gracefully.
-
End events clarify process termination outcomes—use results like Error, Compensation, or Signal to ensure downstream systems and stakeholders receive appropriate notifications.
Remember that BPMN is both a communication tool for business stakeholders and an executable specification for technical teams. Thoughtful event modeling bridges this gap, reducing ambiguity and accelerating implementation. Whether you’re optimizing customer onboarding, automating compliance checks, or orchestrating microservices, mastering BPMN events empowers you to design processes that are resilient, adaptable, and aligned with business value.
Continue refining your skills with hands-on practice, leverage modeling tools like Visual Paradigm for validation and collaboration, and always validate your diagrams with both business and technical audiences to ensure clarity and correctness.
References
- Business Process Model and Notation (BPMN) Official Specification: The official BPMN standard website providing specifications, documentation, and resources for business process modeling notation.
- Business Process Diagram Features and Tools: Visual Paradigm’s comprehensive guide to creating and managing BPMN business process diagrams with professional modeling tools.
- BPMN Tutorials and Learning Resources: A curated collection of step-by-step BPMN tutorials covering modeling techniques, tool operations, and best practices for business process design.
- What is BPMN? An Introductory Guide: A foundational resource explaining BPMN concepts, notation elements, and practical applications for beginners and intermediate practitioners.
- Visual Paradigm YouTube Channel: Official video tutorials, demonstrations, and walkthroughs for BPMN modeling and Visual Paradigm software features.
- Visual Paradigm Support and Assistance: Dedicated support portal for technical assistance, feature requests, and community discussions related to Visual Paradigm products.