


Introduction
Business Process Model and Notation (BPMN) has become the global standard for visualizing, analyzing, and optimizing business workflows. At the heart of every BPMN diagram lie activities—the fundamental building blocks that represent work to be performed. Understanding how to properly model activities using tasks and sub-processes is essential for creating clear, maintainable, and executable process diagrams.

Whether you’re documenting a simple approval workflow or orchestrating a complex enterprise system integration, mastering the nuances of BPMN activities empowers you to:
-
Break down complex processes into manageable, logical units
-
Communicate process requirements effectively to stakeholders
-
Enable automation through precise behavioral specifications
-
Support process improvement initiatives with accurate documentation
This comprehensive guide walks you through everything you need to know about drawing, configuring, and documenting BPMN tasks and sub-processes—including markers, types, hierarchical decomposition, and procedural documentation. Let’s dive in.
BPMN Task and Sub-Process Fundamentals
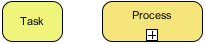
A business process (BPMN) is mainly formed by activities that need to be performed to complete the process. There are two kinds of activities in business process modeling: task and sub-process.
-
Task: You draw a task when the work in the process cannot be broken down to a finer level of detail. A BPMN task is an atomic activity which represents work that is not broken down.
-
Sub-process: You use a sub-process when you want to model the internal details of work in a lower-level process diagram. A sub-process represents work that is broken down to a finer level of detail.
 |
|---|
| Task and sub-process |
Task Markers
You can assign markers to tasks to indicate special execution behavior. There are three primary markers: Loop, Multi-Instance, and Compensation. A task can have one or two of these markers. Assignment of markers is done through the specification dialog box of the task.
| Name | Representation | Description |
|---|---|---|
| Loop |  |
This marker indicates that the task will loop as long as the condition defined in the loop is true. The condition is evaluated in each iteration, at either the beginning or the end of iteration. This marker can be used in combination with the compensation marker. |
| Multi-instance (parallel instances) |  |
This marker indicates the execution of task in a desired number of instances or in a data driven approach. The instances will be started at the same time. |
| Multi-instance (sequential instances) |  |
This marker indicates the execution of task in a desired number of instances or in a data driven approach. The instances will be executed one after the other. |
| Compensation |  |
To undo (cancel) the result of another activity that has already been successfully completed. The execution of compensation task is due to undesired results and possibly side effects produced by another activity that need to be reversed. A compensation task is performed by a compensation handler, which performs the steps necessary to reverse the effects of an activity. |
Adding a Loop Marker
-
Right-click on a task and select Open Specification… from the popup menu.
-
Select Standard Loop for Loop type. Click OK to confirm the changes.
NOTE: You can click on the … button next to Loop type to set the loop condition, counter, and the maximum number of iterations.
Adding a Multi-Instance Marker
-
Right-click on a task and select Open Specification… from the popup menu.
-
Select Multi-Instance Loop for Loop type. Click OK to confirm the changes.
NOTE: You can click on the … button next to Loop type to set the ordering of loop, either parallel or sequential.
Adding a Compensation Marker
-
Right-click on a task and select Open Specification… from the popup menu.
-
Check Compensation at the bottom of specification and click OK to confirm the changes.
Task Types
In business process modeling, there are several types of tasks to separate the behavior of different tasks. You can set a type by right-clicking on a task and selecting Type, then choosing the type from the popup menu.
| Name | Representation | Description |
|---|---|---|
| Service |  |
A service task is a task that uses some sorts of service, e.g., a Web service. |
| Send |  |
A send task is a task that sends a message to an external participant. The task is said to be completed once the message has been sent. |
| Receive |  |
A receive task is a task that waits for a message to arrive from an external participant. The task is said to be completed once the message has been received. |
| User |  |
A user task is a task performed by a human with the assistance of a software application. |
| Manual |  |
A manual task is a task that is performed without the aid of any business process execution engine. |
| Business Rule |  |
A business rule task allows the process to provide input to a business rules engine and to get the output from the engine. |
| Script |  |
A script task involves a script defined by modeler or implementer in a language that a business process engine can understand and is executed by a business process engine. |
| Reference |  |
A reference task refers to another task for its content. |
Types of tasks
Sub-Process Markers
You can assign markers to sub-processes. There are four markers: Loop, Multi-Instance, Ad-hoc, and Compensation. A sub-process can have up to three markers, excluding the marker for collapsed: a loop/multi-instance marker, an Ad-hoc marker, and a Compensation marker. Assignment of markers is done through the specification dialog box of the sub-process.
| Name | Representation | Description |
|---|---|---|
| Loop |  |
This marker indicates that the sub-process will loop as long as the condition defined in the loop is true. The condition is evaluated in each iteration, at either the beginning or the end of iteration. This marker can be used in combination with the ad-hoc and/or compensation marker. |
| Multi-instance (parallel instances) |  |
This marker indicates the execution of sub-process in a desired number of instances or in a data driven approach. The instances will be started at the same time. |
| Multi-instance (sequential instances) |  |
This marker indicates the execution of sub-process in a desired number of instances or in a data driven approach. The instances will be executed one after the other. |
| Ad-hoc |  |
This marker indicates that a sub-process is a group of activities that have no required sequence relationship. The sequence and number of performances for activities are determined by the performers of the activities. |
| Compensation |  |
To undo (cancel) the result of another activity that has already been successfully completed. The execution of compensation sub-process is due to undesired results and possibly side effects produced by another activity that need to be reversed. A compensation sub-process is performed by a compensation handler, which performs the steps necessary to reverse the effects of an activity. |
Different markers of sub-process
Adding a Loop Marker
-
Right-click on a sub-process and select Open Specification… from the popup menu.
-
Select Standard Loop for Loop type. Click OK to confirm the changes.
NOTE: You can click on the … button next to Loop type to set the loop condition, counter, and the maximum number of iterations.
Adding a Multi-Instance Marker
-
Right-click on a sub-process and select Open Specification… from the popup menu.
-
Select Multi-Instance Loop for Loop type. Click OK to confirm the changes.
NOTE: You can click on the … button next to Loop type to set the ordering of loop, either parallel or sequential.
Adding an Ad-hoc Marker
-
Right-click on a sub-process and select Open Specification… from the popup menu.
-
Make sure the type of sub-process is set to be Embedded Sub-Process. Check Ad-hoc in the Details section and click OK to confirm the changes.
Adding a Compensation Marker
-
Right-click on a sub-process and select Open Specification… from the popup menu.
-
Check Compensation at the bottom of specification and click OK to confirm the changes.
Sub-Process Types
There are several types of sub-processes to separate the behavior of different sub-processes. You can set a type by right-clicking on a sub-process and selecting Type, then choosing the type from the popup menu.
| Name | Representation | Description |
|---|---|---|
| Embedded |  |
An embedded sub-process is a sub-process that models its internal details in another process. |
| Reusable |  |
A reusable sub-process calls a pre-defined process. |
| Reference | 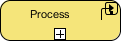 |
A reference sub-process refers to another sub-process. |
Types of sub-processes
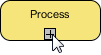
Breaking Down a Sub-Process
A sub-process can be opened up to model the detail at a lower level. To open up a sub-process:
-
Click on the plus marker (+) in the sub-process.
-
Select New Business Process Diagram.
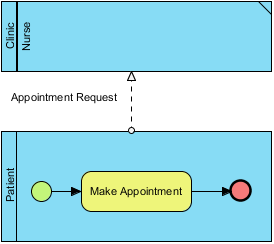
This will create a new business process diagram that belongs to the sub-process. In the sub-process diagram, you will see the in/out flows that allow you to connect the flow from parent to sub-diagram. Click here if you want to learn more about in/out flows.
 |
|---|
| To break down a sub-process |
NOTE: Once a sub-process diagram is created, its detail will be shown as the sub-process shape as a thumbnail of the diagram. To hide the thumbnail, click on the minus marker (-) at the bottom of sub-process to turn it off.
Re-using Elements from Parent Diagram
In the sub-process diagram, you can re-use pools, lanes, and flow objects that appear in the parent diagram. To do this:
-
Right-click on the sub-process diagram.
-
Select Add Pools/Lanes/Sub-Processes/Gateways from Parent Diagram… from the popup menu.
-
Choose the element to reuse.
Elements being re-used will have a dog ear appeared at their corners.
 |
|---|
| A sub-process diagram with a lane reused from parent diagram |
You can jump from a re-used element back to the parent diagram through the resource-centric interface.
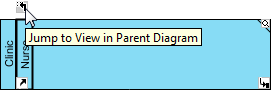 |
|---|
| Jump to parent diagram |
Defining Procedure of Activity
An activity within a process represents work that needs to be done. Each activity can be formed by a number of steps. For example, a task Process Application involves 2 steps: validate application, confirm application. To document the steps of an activity, you can make use of the procedure editor.
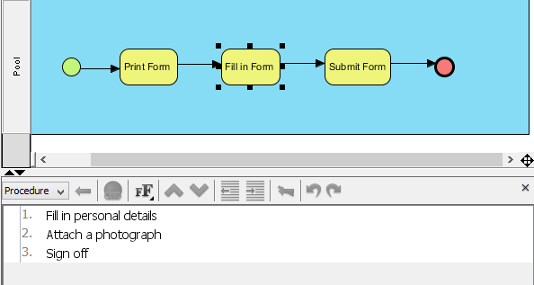 |
|---|
| Procedure of a task |
An Overview of Procedure Editor
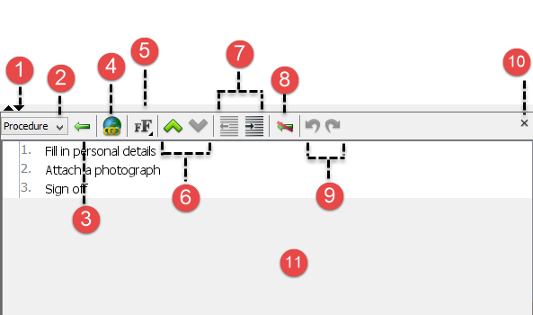 |
|---|
| An overview of procedure editor |
| No. | Name | Description |
|---|---|---|
| 1 | Collapse/Expand | Click on the triangle on the left-hand side to maximize the editor. On the contrary, click on the inverted triangle to minimize the editor. |
| 2 | Procedure selector | You can define multiple sets of procedure per activity. Click on this drop-down menu to select the one you want to read/edit. |
| 3 | Step | Click on this button to create a step under the step selected in editor. |
| 4 | Hyperlink… | Add a link in the selected step for reference. |
| 5 | Font formats selector | There are three buttons. While the first one increases the font size for one level, the second one decreases the font size for one level, and the third button resets the font size setting to default. |
| 6 | Font size setting selector | Click on this drop-down menu to select the sizes of highlighted text. Press Grow Font button to increase the font size for one level, press Shrink Font button to decrease the font size for one level, and press Default Font button to reset the font size setting to default. Moreover, you can adjust the font size for the highlighted text manually by slider. |
| 7 | Reorder step | Click on Move Up button to move the selected step upwards or Move Down button to move the selected step downwards. |
| 8 | Decrease Indent/Increase Indent | Click on Decrease Indent button to reduce the indentation of the selected step or click on Increase Indent button to indent the selected step. |
| 9 | Undo/Redo | Click on Undo button to revert change or click on Redo button to redo reverted change. |
| 10 | Close editor | Click on this button to close the editor. |
| 11 | Steps editor | The place where you can read and edit steps. |
Description of procedure editor
Showing/Hiding Procedure Editor
The procedure editor is opened in business process diagram by default. To hide it:
-
Right-click on the background of the business process diagram and deselect Show Procedure Editor from the popup menu.
-
You can select the same menu to show it when hidden.
NOTE: Alternatively, you can close the editor by clicking on the cross button at the top right corner of the editor panel.
Documenting the Procedure
-
Select the task or sub-process that you want to document its procedure.
-
Click on the first row labelled 1 and enter the first step.
-
Press Enter to go to the next step. You can create a sub-step by pressing Tab on a step. Pressing Shift+Tab decreases the indentation of a sub-step.
-
Repeat steps 2 and 3 to enter the remaining steps the activities involve.
Conclusion
Mastering BPMN tasks and sub-processes is fundamental to creating effective, scalable, and maintainable business process models. By understanding when to use atomic tasks versus hierarchical sub-processes—and how to enhance them with markers, types, and procedural documentation—you gain the ability to model workflows that are both human-readable and machine-executable.
Key takeaways from this guide:
✅ Tasks represent atomic work; sub-processes enable hierarchical decomposition
✅ Markers (Loop, Multi-Instance, Compensation, Ad-hoc) add behavioral semantics
✅ Task types (Service, User, Script, etc.) clarify execution context
✅ Sub-process types (Embedded, Reusable, Reference) support modularity and reuse
✅ Procedure editors allow detailed step-by-step documentation within activities
✅ Parent-child diagram linking enables navigation and element reuse across levels
As you apply these concepts, remember that good BPMN modeling balances clarity with completeness. Start with high-level processes, then drill down using sub-processes where detail is needed. Use markers and types purposefully to convey execution behavior without cluttering your diagrams. And always document procedures where human understanding or auditability matters.
With these practices, your BPMN diagrams will become powerful tools for communication, analysis, automation, and continuous improvement across your organization.
References
- BPMN Official Specification: The official website for Business Process Model and Notation, providing the standard specification and resources for BPMN modeling.
- BPMN Tutorials Collection: A curated library of step-by-step tutorials teaching practical operation with BPMN modeling tools.
- What is BPMN? – An Introductory Guide: A beginner-friendly guide explaining BPMN fundamentals, notation elements, and modeling best practices.
- Visual Paradigm YouTube Channel: Official video tutorials, product demonstrations, and BPMN modeling tips from Visual Paradigm.
- Visual Paradigm Know-How: A knowledge base featuring tips, tricks, Q&A, and solutions to common user challenges in business process modeling.
- Visual Paradigm Support Portal: Direct access to technical support, documentation, and community assistance for Visual Paradigm users.
- Business Process Diagram Feature Overview: Detailed information about creating and managing business process diagrams in Visual Paradigm.
- In/Out Flows in Sub-Processes Documentation: Technical reference explaining how to connect flows between parent diagrams and sub-process diagrams using in/out flow elements.